Sunday, December 30, 2012

Christmas Gift Tags


Gift tags I made for this year's Christmas gifts were cut at 3 3/4 X 2 1/4 using the Tags, Bags Boxes and More Cricut cartridge. Other elements used:
Cardstock(Bazzill)
Snow(Fiskar Punch)
Paper(Wausau)
Stamp(Michaels $1.50, Recollections and Inkadinkado)
Stars(TCW Stencil)
Tag(Cricut Tags, Bags, Boxes and More)
Ink(Ranger Distress and Momento)
Mini Staple(Tim Holtz)
Scissors(Tim Holtz)
Ribbon(Michaels)
 
The edges of the tags were inked with the Rangers Distress ink. The stars were stenciled using distress ink. The snowman was stamped using the Momento ink. The "Snow" was cut using a Fiskar punch and freehand cut to look like mounds of snow on the front of the tag.  Than the back of the tags were stamped with acrylic snowflakes and sentiment using a Fiskars stamping plate with distress ink. Ribbon was run through the slit and held in place with a mini staple.

Sunday, July 8, 2012

In Seattle

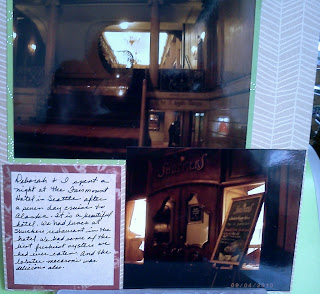
After an Alaskan cruise with my daughter, Deborah we stayed at the Fairmont Hotel for a couple of days in August 2010. While I was just in VA for three weeks this June I had pictures from the trip printed at CVS. I know I am way behind in scrapping, but I like to do things as I feel them. That's one of the advantages of being retired. We had a crop gathering at my daughter's home and here are five(5) of the 8X8 layout pages I made while I was still there in VA.

 The Fairmont Olympic Hotel is beautiful. We really enjoyed our short stay there. We had lunch at the hotel in the Shuckers dining room. And dinner  later in the Georgian dining room.

 Lobster Mac n' Cheese and Calamari were delicioous
The freshest raw oysters we have ever tasted. The Snow and Kumamoto were our favorite, but they were all delicious.


The customized roasted vegetables with crumbled blue cheese on the side that cost me $30 plus dollars, yes $30 plus. But they were well worth it after having a steady diet of fruits of the sea for ten(10) straight days. Consists of:yellow beets, leeks, carrots, parsnips, white asparagus, rutabaga, and garlic. YUMMY!!! That was the only thing I wanted to eat for dinner.

Saturday, July 7, 2012

4th of July SOC Challenge

On the SOC site one of the ladies gave us a sketch and challenged us to make a 4th of July layout. I chose to make a layout using some of the pictures I took in Alaska in August 2010. These pictures of and near the Hubbard Glacier were taken while I was cruising on the Holland America Rotterdam with my daughter Deborah.

I used the Cricut Expression and the Stand and Salute cartridge.

Saturday, June 16, 2012

First Album Finished

         Well, I have been scrapbooking for eight years and I have several scrapbooks in different stages of started. Now, I have finally finished creating a scrapbook. This scrapbook is about my perspective of our 2010 Family Reunion cruise. The incentive to finish it and share at the Family Reunion we just finished having last weekend. I have shared a couple of the pages from the book in the previous blog post. Unfortunately, I can not share the rest of the pages with you, because I don't publish pictures of the people I scrapbook.
        Now it is onward to complete some of the books I have started and begin some others I would like to get done. One is a request by my son for a book about him as a child and young man. I have bought the album and some supplies for it, next I need to scan pictures and put it all together. The other album I want to get started is a heritage album. So far I have bought paper for it.

Monday, May 21, 2012

2010 Family Reunion Album

In a few weeks we will be having our bi-annual family reunion in Virginia. We are very excited because Virginia is the State where our mother was born 100 years ago.

I am in the process of trying to finish making a 12 X 12 album of our 2010 reunion that was a Caribbean Cruise.  I will share with you two of the pages that I have completed.

Title page for the album


Life is a Beach, Create a Critter, Simply Charmed, Disney Pooh & Friends Cricut cartridges, Peachy Keen stamp, and RK Success chalks

One of the ports of call
Life is a Beach Cricut cartridge, Sizzix Distressed Stripes embossing cartridge, TH Distressing Inks, AC Cardstock, Bazill Basic cardstock, Little Yellow Bicycle cardstock, Glossy Accents


Wednesday, May 2, 2012

Birthday Card for 102nd Birthday

May 7, 2012 Cousin Clara will be celebrating her 102nd birthday. Our family finds it truly to be a blessing, that she is still able to live in her own home, able to walk and loves to spend time with the family.
I made this card to send her, because she loves to receive mail. Once again I put the Cricut Imagine to work using Lori's Garden for the birdcages. I also used Martha Stewart's Trellis punch and DCWV Spring Fling Stack.
 Envelope made using MS Scoreboard

 Rhinestones from Michaels added to the bottom of the cage.

 The layers of the birdcage were raised with foam squares.


The inside of the card

Thursday, March 15, 2012

Vagabond


Today Sizzix is offering more travel stamps and a pair of sizing keys to people who link pictures of the location of their Vagabond in the world.

In January I bought the Sizzix Tim Holtz Vagabond diecutter later today I am going to give it a workout.

Tuesday, March 13, 2012

I Finally Made Something with the Imagine

I bought the Imagine in May 2011, but today is the first time I have really used it. When I first bought it I set it up, calibrated it and was ready to use it, but I didn't have anymore white paper. I ordered two packs of Bazzill from HSN in October. At the end of November I was ready to give it a go, but the black ink cartridge wasn't working. In January I called Provocraft and told them about the ink situation and they sent me not only a new black, but also a new color ink cartridge. Today I finally installed the new ink cartridges and I gave the machine a whirl.

I made two cards using the birdcage on page 24 of the Imagine More Cards cartridge. I chose to use the layers option. I used foam popups to raise the flower and the sentiments. Than I used the foam popups to add the whole design to the card.

The card base is embossed using the Script Cuttlebug folder and the Cuttlebug. The sentiment medallion was cut using the X-Large Fiskars Oval punch. The sentiment is a clear Heros Art acrylic stamp.


Friday, March 9, 2012

Alphabet Book for Malia

I decided to make an alphabet book for my one year old great granddaughter, Malia Rose using the letters of her name. The base of each page was cut from cereal boxes using the Cricut Expression with the deep blade and housing. (blade 4, pressure 6, multicut 2).  The rectangle with rounded corners were taken from the Cricut George &  Basic Shapes cartridge. The letters, phrases and images are found on the Kate's ABCs cartridge.
The pages are nine(9) inches long by five(5) to seven point twenty five(7.25) inches in quarter(1/4) inch increments wide. The alphabet letters used were welded to the base using the Provocraft Gypsy.


DCWV pastel cardstock and DCWV dots, stripes and plaids cardstock were cut using the same designs as the base using the Expression with the regular blade and housing( blade 6, pressure 6, multicut 2). NOTE: for the dots, stripes and plaids used for the reverse side of the page all the pages must be flipped in the Gypsy. The paper was run through the nine inches Xyron to be applied to the page base.


To obtain the full alphabet letter on each page: one set in pastel dots were cut for the page and one set in pale yellow were cut in reverse(flipped) for the other side of the page. They were glued to their respective pages using the Zig 2 Way glue applicator.


The phrases and shapes were sized on the Gypsy and cut with the Expression for each page. I was able to use scrapes of paper in my stash. All the layers were adhered using Zig 2 Way glue applicators.


The covers of the book were cut from cardboard at nine and a half (9 1/2) by seven and a half (7 1/2) using a Fiskars paper trimmer and the corners were rounded using the We R Memory Keepers Corner Chromper. DCWV pastel paper was cut the same way and run through the Xyron to adhere to the cardboard cover.

The We R Memory Keepers Cinch was used to bind the book. The decorative chipboard letters on the cover of the book I bought at least five years ago and I don't know who to credit.